
Deployment Customization
This page describes Publisher architecture and the deployment using YAML files. Whereas the Quickstart will get you started fairly quickly, this page will explain more precisely the individual components being deployed, how to manually deploy the components yourself and how to configure a DNS certificate for the publicly-exposed components. The following pages go into further detail on how to customize your Kubernetes deployments:
The following diagram gives an overview of Publisher’s deployment process and the end result of said process.
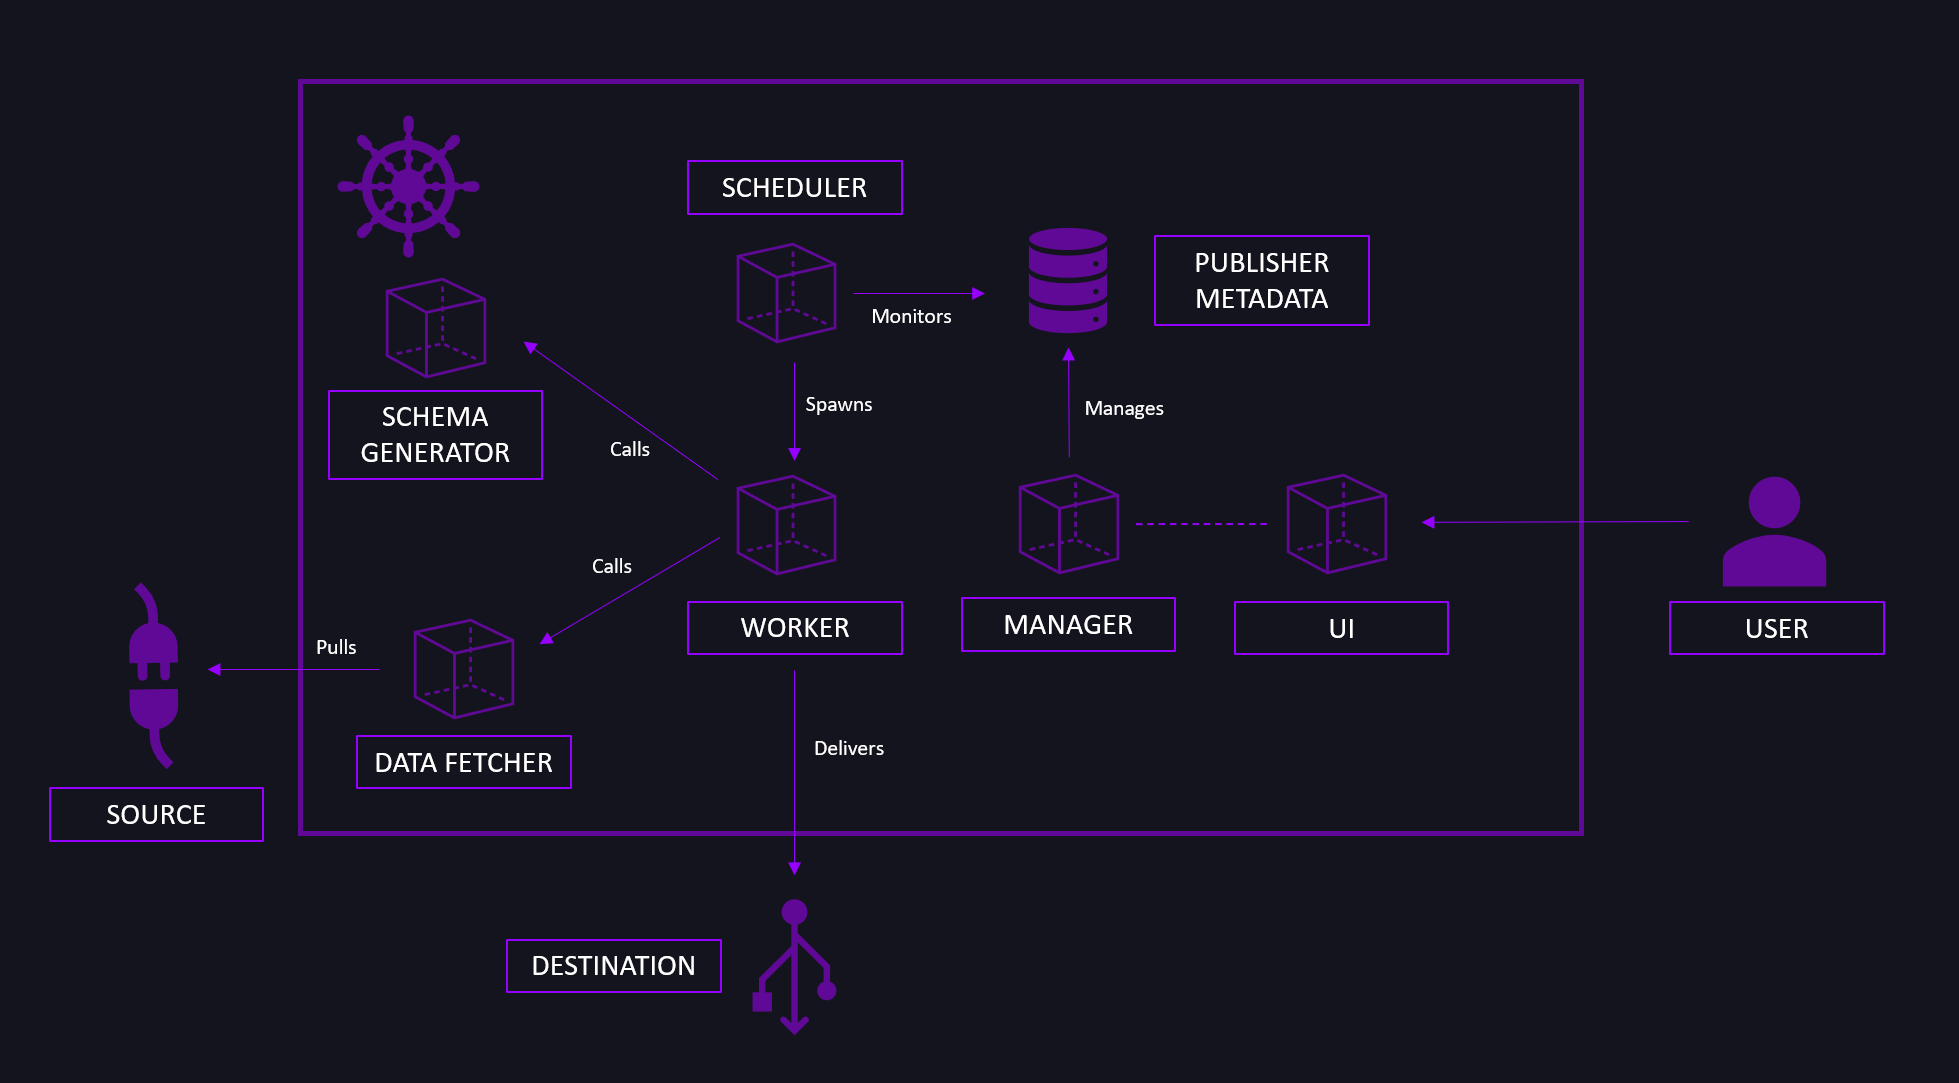
When deploying Publisher, you deploy the following components:
- A Postgres Metadata Database that will be used to store the configuration information on the individual Publisher runs, known sources and destinations.
- A database initialization container.
- The Manager, a simple REST web server connected to the Metadata Database.
- The Scheduler. It communicates with the Manager.
- The Java Data Fetcher used to connect to JDBC-supported database sources, used for performance purposes. It communicates with the sources and the Manager.
- The Avro Schema Serializer component, which dynamically infers and defines the Avro Schema based on the user definition provided.
- The Web UI.
Publisher uses HTTPS for two of its components (Web UI and Manager). To handle HTTPS, two external components must be deployed to the cluster. One to enable external traffic to the cluster, and the other to ensure the external traffic uses HTTPS protocol. Installation is done using public images.
The deployment of required prerequisites is done over Helm. Helm is the package manager for Kubernetes. Helm can be installed using Chocolatey (Windows) and Apt (Debian/Ubuntu). For other operating systems check the official documentation.
On Windows:
choco install kubernetes-helm
On Debian/Ubuntu:
curl https://baltocdn.com/helm/signing.asc | gpg --dearmor | sudo tee /usr/share/keyrings/helm.gpg > /dev/null
sudo apt-get install apt-transport-https --yes
echo "deb [arch=$(dpkg --print-architecture) signed-by=/usr/share/keyrings/helm.gpg] https://baltocdn.com/helm/stable/debian/ all main" | sudo tee /etc/apt/sources.list.d/helm-stable-debian.list
sudo apt-get update
sudo apt-get install helm
To manage external traffic to the cluster, an Ingress Controller solution should be provided. We opted for the Nginx Ingress Controller.
Install the Nginx Ingress Controller:
helm install ingress-nginx ingress-nginx/ingress-nginx --create-namespace --namespace ingress-basic --set controller.service.annotations."service\.beta\.kubernetes\.io/azure-load-balancer-health-probe-request-path"=/healthz
Generate TLS key and TLS certificate which will be used in secrets (you can use the use v3.conf file from here).
openssl req -newkey rsa:2048 -nodes -keyout tls.key -out tls.csr -config v3.conf

openssl x509 -req -in tls.csr -signkey tls.key -out tls.crt -days 365 -extensions v3_req -extfile v3.conf
To use the Web UI and Manager components, DNS records need to be created for Ingress Controllers public IP address.
Extract the Ingress Controller public IP address.
kubectl get services nginx-ingress-ingress-nginx-controller --namespace ingress-basic \
  --output jsonpath='{.status.loadBalancer.ingress[0].ip}'
/
On your domain provider, add two A record sets for the extracted IP address, one for the Manager component and one for the Web UI component.
In case your organization does not own a registered domain, we recommend GoDaddy as the domain provider.
Select the Postgres database credentials (username and password) you wish to use. The password must contain at least nine characters, of which there are two uppercase letters, two lowercase letters, and two numbers.
Generate a 32B Encryption key using a random key generator, or use the default one provided in the deployment file, for messages used by the Worker component (ENC_KEY_1).
Generate a 16B JWT encryption key for secure communication, or use the default one provided in the deployment file (JWT_SECRET).
The YAML files needed for the deployment can be found on:
Using the CLI, apply the Publisher deployment files while positioned in the directory with deployment files:
Apply secrets.yaml file:
kubectl apply -f secrets.yaml
Apply publisher.yaml file:
kubectl apply -f publisher.yaml
Wait for the pods to become healthy. Apply ingress.yaml file:
kubectl apply -f ingress.yaml
In order to integrate Publisher with the Dataphos Schema Registry, you need to pass the IP address or service name to the variable SCHEMA_VALIDATION_URL. If the Schema Registry is in the same cluster, pass the internal DNS name of the service http://<schema-registry-service-name>.<sr-namespace>.svc.cluster.local. After Dataphos Schema Registry has been deployed, you can obtain the Dataphos Schema Registry service information by running:
kubectl -n dataphos get svc schema-registry-svc